
From Streams to Summit: The Katadyn BeFree Water Filtration System for Ultralight Efficiency

“No system is perfect for everyone, but with time and experimentation, you can find what works best for you.”
Table of Contents
Why Water Filtration Is Personal
Ask a dozen hikers what they use to treat their water, and you’ll likely get a dozen different answers. Some prefer pump filters for their efficiency and ease of use, others rely on chemical drops or UV light treatments, many favor ultralight squeeze filters, and a few roll the dice, trusting the mountain streams are clean enough. I’ve experimented with all of these methods over the years.
You’ll hear even more variety when you ask how they carry and consume their water. Some stick with hard-sided bottles, like the nearly indestructible Nalgene. Others choose heavy-duty reservoirs, such as the rugged (and heavy) MSR Dromedary. Some go with mid-weight hydration bladders like a CamelBak for convenience. Meanwhile, ultralight hikers tend to favor collapsible water storage options, like the HydraPak Seeker or CNOC Vecto.
No One-Size-Fits-All Solution
The reality is that water treatment isn’t a one-size-fits-all decision. The ideal system depends on factors such as your hiking location, environmental conditions, trip duration, weight considerations, the number of people relying on your filtration, and your personal risk tolerance. Some ultralight hikers push the limits with minimal treatment, while others carry multiple backups to prepare for any potential failure.
After experimenting with various approaches, I’ve fine-tuned a system that works for both solo adventures and group trips. Here’s how I balance weight, simplicity, and reliability.
Finding My System: Balancing Weight, Simplicity, and Reliability
I’ve settled on a filtration system that prioritizes ultralight weight, simplicity, and ease of use over long-term filter lifespan. Since most of my trips range from 2 to 5 nights and span both freezing and non-freezing conditions, I needed a system that adapts to varying environments. The best backpacking water filter setup for my needs strikes a balance between ultralight weight, fast flow rates, and the reliability needed to handle diverse conditions efficiently.
I primarily hike in California’s diverse mountain ranges—including the Sierra Nevada, southern Cascades, and coastal ranges—where waterborne viruses are rarely a concern due to the clean, fast-moving streams at higher elevations. As a result, my system focuses on filtering bacteria and protozoa, the most common threats in these areas.
My System, My Rules—And How You Can Build Yours
This guide isn’t about finding the ‘best’ filtration method—because that depends on your own needs and priorities. Instead, I’ll walk you through the system I personally rely on, why it works for my style of backpacking, and how you can tweak or adapt these ideas to build a system that fits your own trips. Whether you prioritize ultralight efficiency, durability, or a foolproof backup plan, my goal is to help you dial in a setup that gives you confidence on the trail.
Primary Filter: Katadyn BeFree (1.2 oz)
Why it's great:
- Ultra Lightweight Design
- Fast Flow Rate 1L = 0:25
- Simplicity: Cleaning and Storage
- Less Susceptible To Freezing Than Other Options
Limitations:
- 42mm Wide Mouth Reservoirs Only
- Shorter Lifespan 1000L
- Less Ideal For Silty or Murky Water Environments
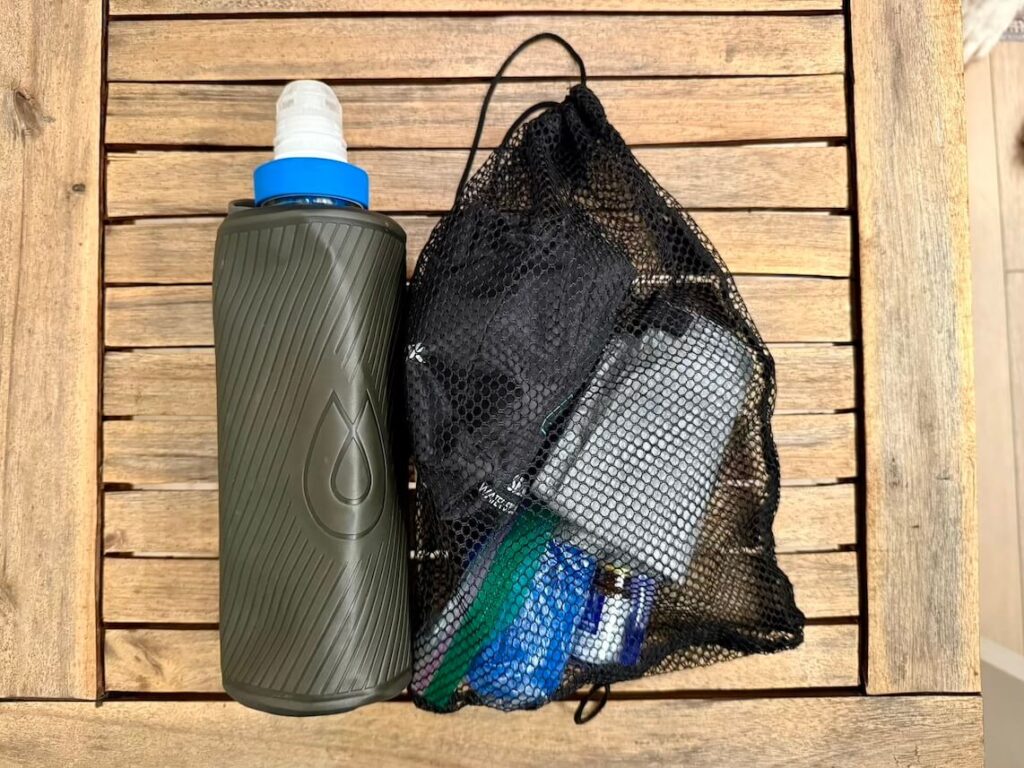
Backup Purification: Potable Aqua Tablets (1-2 oz)
Why it's great:
- Ultralight 1.1 oz (Iodine) or 2.2 oz (neutralizer)
- Reliable Backup in Emergencies
- Compact & Zero Maintenance
Limitations:
- 30 Minute Waiting Time (60 if cold or murky)
- Iodine Taste & Odor (Even with neutralizer)
- Shelf Life (1yr once opened)
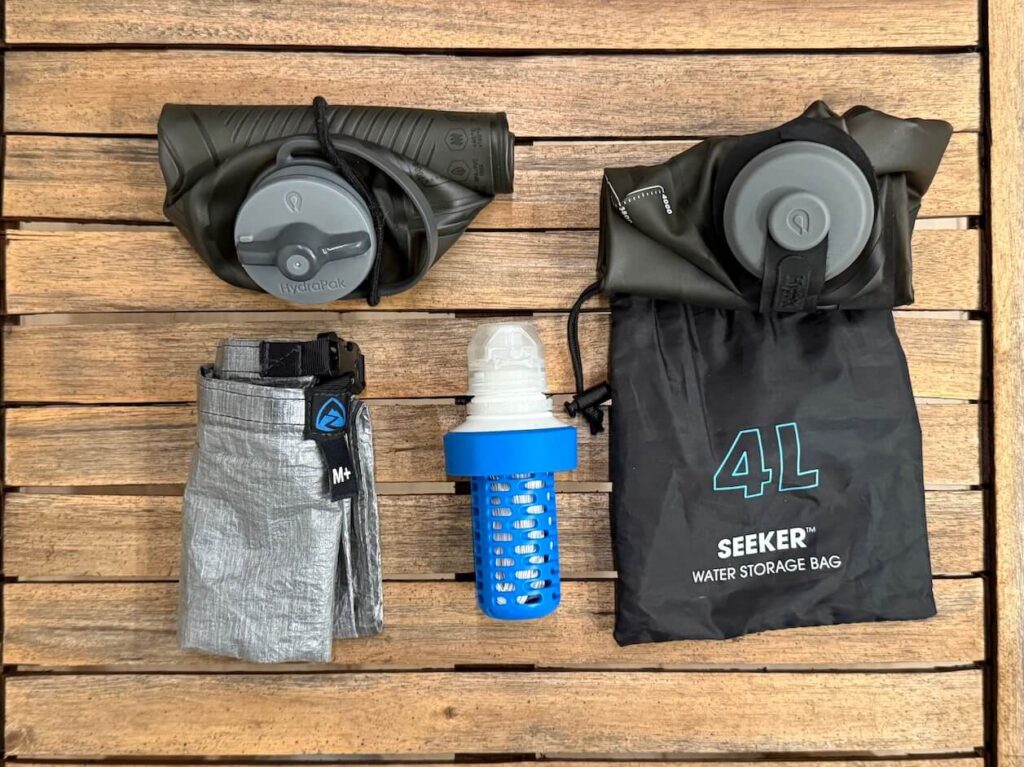
HydraPak Flux 1L (2.8-3.6 oz w/o OEM cap)
Why it's great:
- Flexible Bottle (Sip & Squeeze continuously)
- Easy to Fill (42mm Wide Mouth)
- Durable
- Collapsible Design Saves Space When Empty
Limitations:
- Limited Compatibility (wide mouth)
HydraPak Seeker 4L (3.7 oz)
Why it's great:
- Lightweight & Packable
- Bulk Water Storage at Camp or Water Carries
- Durable
- Collapsible Design Saves Space When Empty
Limitations:
- Limited Compatibility (wide mouth)
Zpacks Medium-Plus Dry Bag (0.7 oz, 8.2L)
Why it's great:
- Ultralight & Packable
- Protects H2O Storage From Puncture & Leaks
- Protects Pack Items From Water Leakage
- Durable Dyneema Fabric + Taped Seams
- Collapsible Design Saves Space When Empty
Limitations:
- Cost Dyneema is Expensive
Total Weight Of Water Filtration and Carry System
Depending on whether you include the neutralizer for the Potable Aqua tablets and if you use the OEM screw top on the HydraPak Flux, is as follows:
• Minimum Total Weight: 9.5 oz
•(Includes Potable Aqua without neutralizer and HydraPak Flux without cap)
• Maximum Total Weight: 11.4 oz
•(Includes Potable Aqua with neutralizer and HydraPak Flux with OEM cap)
This system balances weight, efficiency, and adaptability, allowing me to handle both solo trips and group filtering while keeping everything as light and simple as possible. These items form the backbone of my ultralight system, providing flexibility and reliability across different conditions. Let’s explore why I chose them.
Tip: Bring the OEM cap for HydraPak Flux if you have other bottles to fill (can’t just place the BeFree right back on the Flux). Or if need a more leak resistant storage option (don’t rely on sport caps of any kind).

Why It's Great: The Total Package
Katadyn BeFree: I chose this filter for its ultralight design and fast flow rate—perfect for on-the-go filtration during shorter backpacking trips.
Potable Aqua Tablets: Compact, reliable, and ultra-lightweight, these are a dependable backup for freezing conditions or filter failure. Reserved for emergency use only, with the only maintenance being to check the expiration date.
HydraPak Flux 1L: Lightweight, flexible, and compatible with the BeFree, it fits easily on my shoulder strap for quick access while hiking. Its flexible design allows me to drink continuously without needing to loosen the cap to let air equalize.
HydraPak Seeker 4L: My go-to for two main reasons: it serves as both my primary filter bag and additional water carry and storage. I use it as a dirty water (unfiltered) bag to filter and fill several bottles, making it ideal for group trips. Its wide mouth allows for quick and easy filling in streams. With a 4-liter capacity, it provides the bulk storage I need, offering flexibility for longer stretches between water sources. When hiking with a group of 4 I will bring 2 of these bags to reduce the amount of return trips to the stream or lake to refill.
Zpacks Dry Bag: Lightweight and highly water-resistant, this bag provides a puncture barrier to protect reservoirs and adds leak protection to keep your pack dry in case of accidental spills.
How I Carry, Consume, and Store Water
I typically keep the Katadyn BeFree filter on my easy to access HydraPak Flux 1L flexible water bottle held in a Zpacks Water Bottle Sleeve fixed to the front of my left shoulder strap of my Zpacks Arc Haul Ultra backpack. This setup allows me to sip water without stopping, and the flexible bottle lets me drink the entire contents without needing to release pressure (burping). Note: I always stop to drink when on steep or unstable terrain.
Limitations
Filter Clogging
Silty or sediment-heavy water can slow or completely block the flow of a hollow-fiber filter like the Katadyn BeFree or Sawyer Squeeze. Prevention starts with collecting water from the clearest sources available. When filling from a stream, I let the current naturally fill the dirty water bag and avoid scooping or disturbing sediment whenever possible. In shallow streams, I’m especially careful not to stir up dirt from the bottom.
If the filter clogs or slows down, shaking or “swishing” it in clean water can sometimes dislodge the blockage. My go-to method is using the HydraPak Flux 1L, half full of filtered water. I screw on the BeFree filter and shake it vigorously until the flow rate improves.
Leaks, Punctures, and Ruptures
Soft-sided reservoirs, though ultralight, can be susceptible to punctures, pinhole leaks, and in the worst cases full rupture. These issues often occur when sharp objects puncture the reservoir or from the force applied while squeezing it to filter water. The HydraPak Seeker reservoir is thick and durable, making leaks from moderate force during filtering unlikely—though not impossible with improper use or excessive pressure.
I use the Zpacks Dry Bag for dual protection—it shields my backpack’s contents from leaks and helps prevent external punctures to my reservoirs. To catch potential issues early, I check my reservoirs before and after trips by filling them with water to look for leaks or wear. I also carefully seal my water bottles—never relying on sport caps—and store them inside the Zpacks Dry Bag for extra protection when storing water in my backpack, tent, or sleeping bag in freezing temperatures. Waking up to a water-soaked sleeping bag from a leaking reservoir is a mistake you never want to make.
Lesson learned: Even the most durable water storage bags can fail, so I always carry a backup plan, such as chemical purification tablets.
Freezing Temperatures
Ice expansion can permanently damage hollow-fiber filters, making it essential to prevent freezing. I store the filter inside a ziplock bag and place it in my sleeping bag overnight. During the day, I keep it inside my jacket, ensuring it stays above freezing. Anything warm enough to keep me comfortable will also protect the filter for the most part.
In The Field
Storage and Filtration Strategies
When water sources are abundant and their locations are verified through reliable sources like ranger reports, I can confidently plan my refill points without worry. In these cases, I often fill my 1L bottle, screw on the Katadyn BeFree, and squeeze filter as I drink, knowing there will be frequent WFOs along the way.
Longer Stretches Between WFOs
If I anticipate longer distances between WFOs, I’ll partially or fully fill my HydraPak Seeker 4L and filter as needed. I attach the Katadyn BeFree directly to the Seeker and use it to refill my smaller bottles on the go.
On tougher hikes, like Mount Whitney, I carry:
•One Smartwater bottle with electrolytes (e.g., Liquid IV with probiotics).
•One HydraPak Flux 1L with plain water.
•One HydraPak Seeker 4L for additional storage.
Both the Smartwater bottle and HydraPak Flux are mounted on my shoulder straps, allowing me to drink on the move without stopping. For extra capacity, I carry my HydraPak Seeker 4L inside my pack, generally bringing what I estimate I’ll need plus an extra 1L for flexibility. Even though the Seeker is durable, I store it in my Zpacks Medium-Plus Dyneema Dry Bag to keep my backpack dry—because no matter how careful you are, leaks happen eventually.
💡 Risk vs. Weight: How Much Water Should You Carry?
How much extra water—and thus weight—you carry is ultimately a matter of risk tolerance. Some ultralight hikers carry the bare minimum, confident they’ll reach their next water source without issue. Others take a more conservative approach, ensuring they have backup water in case a planned source is dry..
As a backpacker who leans toward the prepper (always prepared) side of the scale, I have to consciously temper this tendency. Carrying extra water provides peace of mind, but every extra ounce adds up quickly. Over time, I’ve learned to balance my instincts for preparedness with the reality of how much I actually need based on terrain, expected water sources, and environmental conditions..
⚠️ Beware of extremely hot environments. I had some friends do Cactus to Clouds on Mount San Jacinto near Palm Springs, California—one of the hardest and most exposed hikes in the U.S. They ran out of water on the way down, got dehydrated, and came dangerously close to heat exhaustion or heat stroke. In situations like this, you MUST err on the side of caution. Heat-related illnesses can escalate fast, and running out of water in high temperatures can have serious, even life-threatening, consequences.
This route is notorious for extreme temperature swings. You can start in the Palm Springs desert with temperatures soaring well above 100°F, then climb over 10,000 vertical feet to cooler alpine conditions, sometimes experiencing a 50°+ temperature difference between the desert floor and the summit. That kind of delta can lull hikers into a false sense of security. You might be shivering at the top and then dangerously dehydrated just hours later on the descent.
💡 Pro Tip: In ultra-hot environments like Cactus to Clouds, carrying extra water isn’t optional—it’s survival. Plan your water strategy carefully, and always err on the side of bringing more than you think you’ll need.
Bottom line: The “right” amount of water is highly individual—assess your comfort level with risk, the demands of the terrain, and your ability to adapt to unexpected changes on the trail.At Camp
I aim for efficiency at camp—the faster I handle chores, the sooner I can relax and enjoy the scenery. To minimize trips to the water source, I try to fill all my bottles once per day at base camp.
•If I’m with a group, I filter water for everyone’s bottles in one go.
•I also fill two HydraPak Seeker 4L bags with untreated “dirty” water for later filtering back at camp. This cuts down on time spent at the water source, which is often swarming with mosquitoes or located in spots that aren’t ideal for filtering—usually requiring you to squat or kneel on uneven ground.
•It’s important to remind everyone which bags contain untreated water to avoid accidental drinking before filtering.
Conclusion: TL;DR
Finding the right water filtration and carry system is personal and depends on your trip length, terrain, and risk tolerance. My setup revolves around the Katadyn BeFree filter for its lightweight design, HydraPak reservoirs for flexibility and bulk storage, and Potable Aqua tablets as a reliable backup. I’ve refined this system through trial and error to balance ultralight weight with reliability, using strategies like dirty water storage at camp and precautions to prevent filter freezing or leaks. The best backpacking water filter setup ensures that I’m prepared for both solo and group trips while keeping my pack weight low.
No system is perfect for everyone, but with time and experimentation, you can find the best backpacking water filter system that fits your needs and gives you confidence on the trail.
Final Thoughts: My 10 Key Takeaways on Water Filtration and Carry
- Your Water System Should Match Your Trip: Adapt to the terrain, water availability, and trip length.
- Redundancy is Your Safety Net: Always carry a backup (chemical treatment).
- Lightweight Doesn’t Mean Sacrificing Reliability: Plan ahead to balance weight and security.
- Dirty Water Bags Are Game-Changers: Bulk storage at camp makes life easier, especially with groups.
- Hard-Sided Bottles Have Their Place: Switch to them in freezing conditions to prevent failures.
- Prevent Clogs Before They Happen: Pre-filter or let sediment settle before filtering.
- Leaks Happen—Plan for Them: Use dry bags for protection, and never rely solely on a single flexible reservoir.
- Learn from Trial and Error: Test your gear and refine what works through experience.
- Water Treatment Philosophy is Personal: Know your comfort level with risk and water quality.
- Stay Adaptable: Be prepared to change your plan mid-trip based on conditions.