Finding the Sweet Spot [Part 2]: Ultralight Backpacking with an Eye on Comfort and Safety
“If You Have a Large Pack, You May Will Pack a Lot!”
Table of Contents
My Personal Twist on Ultralight Backpacking
Ultralight Boy Scout?
If You Have a Large Pack, You Will Pack a Lot!
When I was around 12 or 13 years old in the Boy Scouts of America, we were given small Kelty brand external frame backpacks. These packs featured a modest three-pocket main compartment, a couple of small side zipper pouches, and limited space for lashing items to the frame. Back then, we traveled light simply because we were kids who couldn’t carry much, and our backpacks (thankfully) had a small capacity.
As I grew older, I had the chance to choose my own “higher-tech” conventional backpacking gear. My new backpack was durable and could carry everything, including the kitchen sink. It had infinite pockets, zippers, a very supportive hip belt, and solid back support—but it was also very heavy. At the time, it worked just fine. I was young, poor, and felt invincible.
My Current Approach to Ultralight Backpacking
Today, I consider myself technically a lightweight backpacker (with a sub-15-pound base weight) who chooses ultralight gear but allows for a bit more weight for added security and luxury. Keep in mind that ‘luxury’ is relative in the context of ultralight backpacking, so calibrate your expectations accordingly.
Building a Safety Net: My Added Security Essentials
Generally, I add a bit of extra weight to increase my margin for error in case things don’t go as planned (and they often don’t). Here are some additional items I bring to ensure I’m prepared for the unexpected:
Oh Sh!t Layer
This is an additional piece of clothing I carry for those moments when you find yourself saying, “Oh Sh!t, the sky is falling,” as an unexpected storm rolls in. It could be a layer warmer than what I think I’ll need or simply an extra layer in case something happens to one of my primary layers. For example, on my last trip to El Capitan in Yosemite National Park with my son Jayden, I brought an extra down sweater (a lightweight down jacket) just in case—whether we lost, tore, or soaked our primary gear, or if it simply wasn’t warm enough. This adds nearly an extra pound of weight, but it’s well worth the peace of mind.
Additional Food
I always bring an extra day’s worth of food (at least 1,000 calories) on my backpacking trips, typically an extra dinner and a snack or two. This extra food doesn’t have to be on anyone’s top 10 list of the best backpacking meals—it just needs to be reliable and easy to pack. This precaution ensures that if I’m stuck due to bad weather, get lost, or need to help another hiker in need, I’ll have enough sustenance to get through the situation safely.
Redundant Navigation Devices
Essential navigation tools for redundancy: a satellite communicator, GPS-enabled smartphone, and GPS-enabled smartwatch, with a reliable map and compass as backup.
I carry multiple navigation devices: a Garmin InReach Mini 2, my cell phone, and a Garmin Epix Gen 2 satellite watch. While two of these devices would suffice for redundancy, I prefer having the third GPS enabled, sport watch visible on my wrist to track my heart rate and confirm I’m on the right course. I like to call this the Trifecta of Redundancy.Even if your phone has GPS capability, always incorporate redundancy into your trip. For group hikers, redundancy might also come from another person with satellite capability—provided there’s an agreement never to separate under any circumstances. For solo hikers, this backup is even more critical, as there’s no one else to rely on. And remember: a map, compass, and the knowledge of how to use them will never run out of batteries!
Redundant Communication Devices
I carry both a mobile phone and a satellite communicator. Even if your phone has satellite capabilities, it’s wise to incorporate redundancy. Even in a group, having more than one communication method is essential.
On a recent trip to San Jacinto near Palm Springs, California, I stopped for a break near a group of other hikers. After exchanging pleasantries, one hiker asked if I thought that the new GPS-enabled iPhones would make dedicated satellite devices obsolete, pointing to my Garmin InReach Mini 2 strapped to my pack. I told him it made sense, but I still plan to keep my Garmin. Here’s why.
The Garmin device is always attached to my backpack with a carabiner, making it difficult to lose. It’s also made from durable, drop- and water-resistant materials, making it far more rugged than my mobile phone. I can’t count the number of times I’ve seen posts in backpacking forums that start with, ‘If anyone finds an X brand phone by the 33rd switchback, it fell out of my pocket somehow.’
Trail Comforts: Small Luxuries for Big Enjoyment
I’ve experienced both ends of the backpacking spectrum: the sub-10-pound ultralighter, the fully-loaded conventional hiker (I’m too embarrassed to tell you the weight), and now what I call the Ultralight Comfort hiker. With a lightweight, sub-15-pound base weight, I’ve found a balance that lets me enjoy added comforts on certain trips—small luxuries that translate to greater relaxation and enjoyment on the trail.
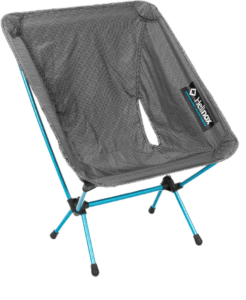
Camp Chair
The Helinox Chair Zero is a 1-pound lifesaver on the trail. For many years, I either sat on a rock, log, or maybe a closed-cell foam pad. While there’s nothing wrong with these options, having an ultralight backpacking chair is worth it on almost all of my expeditions. I even took this on my solo Mount Whitney trip.
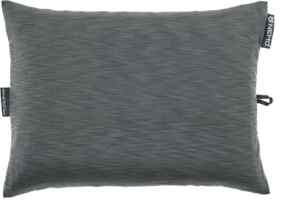
Camp Pillow
The NEMO Fillo Elite Pillow combines inflatable and foam layers for incredible comfort at only 2.8 ounces, making it an ideal choice for ultralight backpackers seeking a restful night’s sleep.
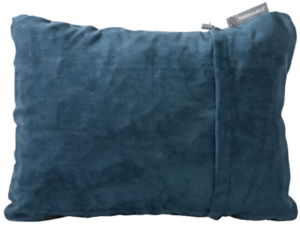
The Therm-a-Rest Compressible Pillow weighs in at 9 ounces, making it heavier than ultralight options like the NEMO, but it's my go-to choice when I can spare the extra weight. P.S. – I’ve even taken two!
The Therm-A-Rest Compressible Pillow (7 oz small) or NEMO Fillo Elite Pillow (3 oz inflatable) are non-negotiable luxuries for me. I used to stuff my jacket into its hood, and that was fine, but these pillows are pure bliss. NOTHING comes between me and my sleep… except altitude.
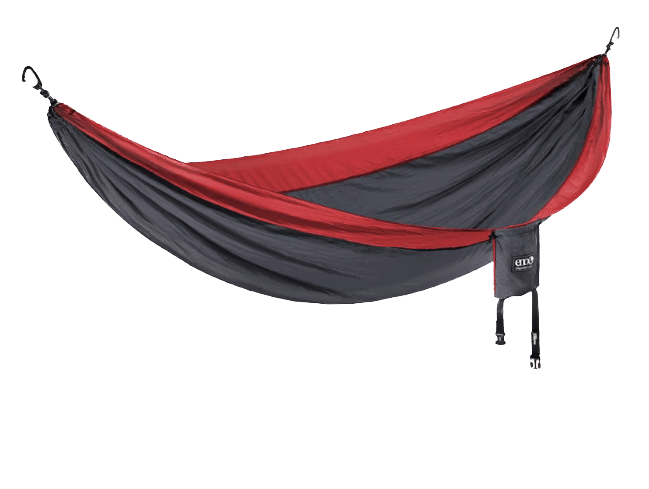
Bonus Item – Hammock and Straps
Weighing only 1 pound, the ENO SingleNest Hammock offers unparalleled comfort on easygoing backpacking trips. Nothing beats the luxury of relaxing in a hammock after a long day on the trail!
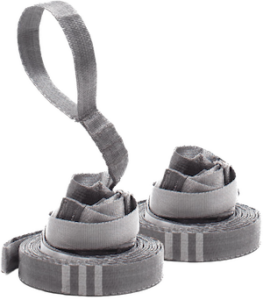
At only 3.2 ounces, the Kammok Python 10 Ultralight Straps are an ideal choice for minimalist hammock setups, providing secure suspension without adding extra weight. The dual-strap design also protects trees by evenly distributing weight, ensuring a stable and eco-friendly setup.
The ENO SingleNest Hammock (1 pound) and Kammok Python 10 Ultralight Straps (3.2 oz) are my ultimate relaxation tools. This one is a stretch and only comes with me on more relaxed trips, but hear me when I say—there’s no level of relaxation I’ve EVER felt on the trail like being in a hammock. Even in a minimalist camp chair, you’re still expending a bit of energy to stay balanced on those narrow legs. But in a hammock, you can completely unwind, gaze up at the sky, or even drift off for a nap.
Why Your Existing Gear Might Be Enough
Don’t Rush into Ultralight Gear
If you’re newer to backpacking, chances are much of the gear you already own (handed down) is sufficient until you’re certain that backpacking is something you want to pursue long-term. I often give the same advice to friends who are interested in doing some of the trips I’ve taken: Start with one or a combination of the following three approaches until you’re sure backpacking is right for you.
Use the Gear You Already Own
If you have reasonably high-quality backpacking gear, it will likely be sufficient for your first few trips. For your initial forays into the backcountry, plan shorter trips close to civilization. This will allow you to dial in your ultralight backpacking gear checklist and, most importantly, develop your outdoor skills.
Borrow or Buy Used Backpacking Gear
If you’re considering switching to a new type of gear—like moving from a sleeping bag to a backpacking quilt—try borrowing from a friend or consider buying used backpacking gear first. This approach allows you to experience the pros and cons without committing to a new, expensive purchase. For example, one of the best backpacking quilts I’ve used is the Enlightened Equipment Revelation 20-degree down quilt. Quilts can be finicky, so it’s helpful to test one out before deciding if a quilt is right for you.
Rent from REI or Similar Outdoor Store
While you may not find much ultralight gear for rent, stores like REI often have a wide range of backpacking and mountaineering equipment available. Renting gear is a great way to try out different items before buying. I’ve rented everything from snowshoes and mountaineering boots to full ski setups for my kids (they outgrow gear so fast!). Additionally, these stores often sell used backpacking gear at a great value, making it easier to find quality gear for a steal.
Gradual Transition
Once you’re confident that backpacking is for you, start incorporating ultralight gear gradually. Adding one piece of UL gear at a time allows you to learn how to use it properly while also spreading out the cost of new gear. This approach helps you build your ultralight kit thoughtfully, without overwhelming your budget or your skill set
Conclusion
Over the course of these two posts, we’ve explored what ultralight backpacking truly entails—its philosophy, the different levels of commitment, and the balance between weight, comfort, and safety. We discussed how ultralight backpacking can help you travel faster, push through physical limitations, and enhance your overall experience in the wilderness. However, we also considered the limitations, from the expense and durability of ultralight gear to the challenges and risks associated with carrying less.
In the second part, I shared my personal approach to ultralight backpacking, where I combine lightweight principles with added security and comfort. Whether it’s carrying an extra layer, bringing along a favorite luxury item, or taking your time with a gradual transition, these strategies are all about making ultralight backpacking work for you.
Final Thoughts
Remember, ultralight backpacking is a deeply personal journey, and there’s no one-size-fits-all approach. It’s about finding your own balance between reducing weight and ensuring comfort and safety on the trail. Whether you’re just starting out or refining your kit, the key is to keep experimenting, learning from each trip, and adjusting your strategy as you go. After all, the goal isn’t just to carry less—it’s to experience more. So, take what you’ve learned, make it your own, and perhaps you’ll find your way to your next summit.
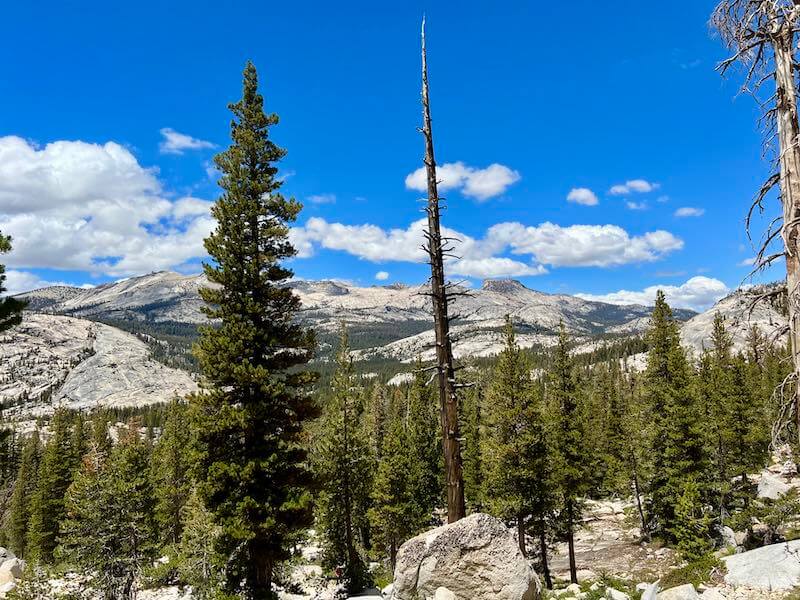
Enjoy the beauty of the outdoors. This unique forked-tongued dead tree served as a crucial landmark for navigating back to our primitive campsite near a seasonal pond, just below Clouds Rest (9,926 ft.) in Yosemite.